This post may contain affiliate links. This means if you purchase through these links, I may earn a small commission, at no extra cost to you. I only recommend products that I personally use and trust, which is why not all the links are affiliated. Your support helps me keep this blog running and allows me to continue creating helpful content. Thank you for your support!
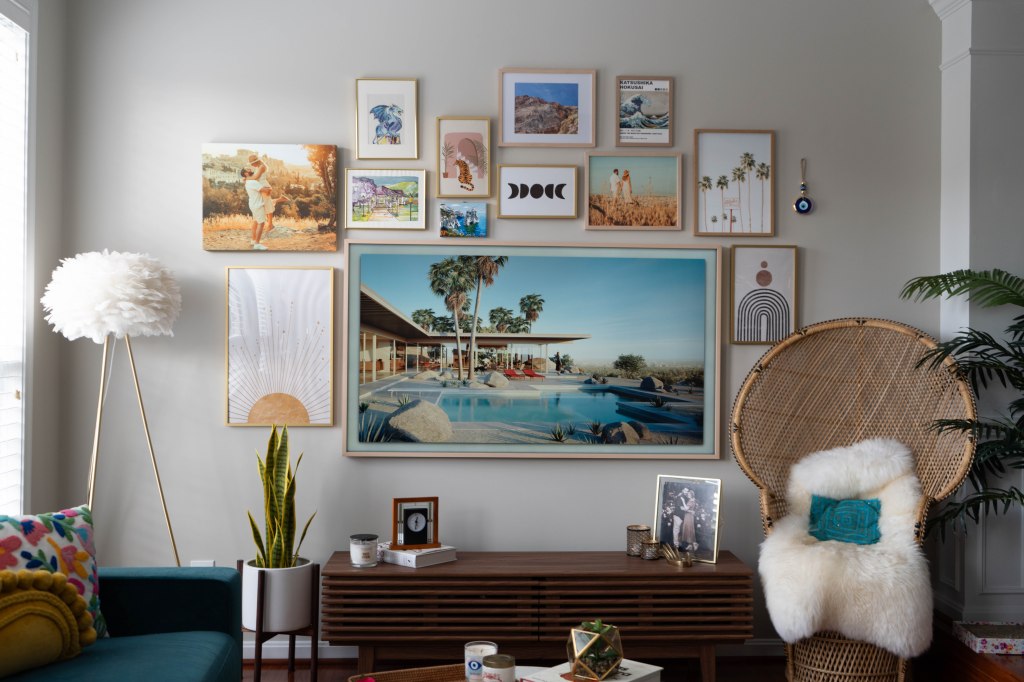
At The Purple Door, we are obsessed with home decor! One thing I have wanted to do for a long time but never had the guts to execute was create a gallery wall around my Frame TV. Now that it’s done, I can’t believe the wall was so bare before! This room brought me joy before but now that joy has been elevated to a new level.
I had been planning the gallery wall for awhile and had a full on Photoshop mockup; however, during the actual process, we went rogue. We ditched some art I intended to hang and incorporated others from around the house. After sitting with it, I knew something was off, so after a week or so we switched out one piece of art for another. Who knows? It could still evolve as time passes, and that’s okay, too! In fact, I would argue it’s encouraged.

Creating a Mock-up
I’m a super visual person so needed to SEE the result as best I could before executing. I used Adobe Photoshop to create a visual mock-up of the plan. I took photos of all the art around the house I was thinking of using for the gallery wall, removed the backgrounds, and scaled them to size. I brought in images of different sized frames and put potential photos/art over them to see how they would look.
If you don’t have Photoshop, don’t fret, there are other options you can use. GIMP is a popular free alternative, as well as Photopea. I’m not an affiliate for either.
In creating my mock-up, it was important that it was to scale. Let me know if you’d be interested in a video explaining how to create mock-ups to scale in Photoshop!

Advice for Creating a Gallery Wall
Creating a gallery wall is a fantastic way to showcase your personality and add visual interest to your space. Here are some tips to help you design an eye-catching and meaningful gallery wall. By no means do you have to follow any or all of this. At the end of the day, your gallery wall is yours and if it brings you joy, that is what matters.
Select a Theme or Concept
Choose a theme or concept that ties the artworks together. it could be a color scheme, a specific subject matter, or a particular style. This cohesion will give your gallery wall a more curated and intentional look.
Mix and Match
Incorporate a variety of art pieces, including different sizes, shapes, and media. Mixing paintings, photographs, prints, and other artworks adds depth and visual interest to your display. Of course, you can also opt for a more uniform gallery (maybe all family photos) if that suits your decor more.
Plan the Layout
Before hanging anything, plan the layout with a mock-up, as discussed above, or on the floor or a large table. Experiment with different arrangements until you find a configuration that you love. This helps avoid unnecessary holes in the wall, but remember, don’t get down on yourself if you do make any unnecessary holes. It’s only drywall!
Consider symmetrical or asymmetrical layouts. Symmetry creates a more formal look, while asymmetry allows for a more eclectic and dynamic display.
Create a Focal Point
Consider creating a focal point by placing a larger or more visually striking piece in the center. Arrange other pieces around it to create balance and symmetry. For us, we had our television as the focal point since it’s so large. It wasn’t realistic to get other pieces of art in any similar size.
Use Consistent Frames or Mats
For a cohesive look, consider using consistent frames or mats for your artwork. This can help unify diverse pieces and create a more polished appearance. Since we already had the light wooden frame for the TV, we went with light wooden and gold frames for the art.
Consider the Wall Color
Take your wall color into account when selecting artwork and frames. Choose pieces that complement or contrast with the wall color to enhance the overall aesthetic.
Maintain Consistent Spacing
Maintain consistent spacing between each artwork. This helps create a harmonious flow and prevents the gallery wall from appearing cluttered. Please note this is a best practice….we simply eyeballed the spacing. I knew if we were going to try to be so precise and exact with measurements, it would stress me out and drive me mad through this process. Ours may not be perfectly evenly spaced, but it’s evenly spaced enough to not bother me. Pick your battles. 🙂
Include Personal Touches
Mix in personal items like photographs, mementos, or handmade pieces to infuse your personality into the gallery wall. It’s a reflection of your life and experiences. Don’t worry if you don’t have enough pieces to complete your gallery wall in this moment. Curating one takes time!!
Be Mindful of Sightlines
Take into account the sightlines from various angles in the room. Ensure that the gallery wall is visible and enjoyable from different vantage points.
Sit With It
After you’re done, sit and live with your wall for a bit. This was easy for us because we were sitting with it whenever we watched TV. Take note if anything irks or bothers you and consider what kind of change you need to make. For us, I realized my “No Worries Mate” wooden sign I got in Australia did not fill the space enough, so we removed that and chose a photo from our honeymoon to get printed instead.
Remember, there are no strict rules, so feel free to let your creativity shine! The most important thing is that the display reflects your personal style and brings you joy.

Shirt Credit: Etsy

I Like Your TV, Tell Me More About It
Ah yes, Samsung’s The Frame TV. We love this thing! Guests have come over and legitimately thought it was art. Particularly when you put up a painting versus a photo, the brush strokes look so realistic. It’s a much better feel than a giant black rectangle on the wall, and you can even upload your own photos, too. People have commented that they’ve never seen a TV sit so flush to the wall, and the wooden bezel around it makes it even more realistic. This was my splurge purchase when we bought the house and I don’t regret it.
Giving this a try? Let me know how it goes in the comments below or in our Facebook group! The Purple Door Group on Facebook is your doorway to a vibrant and supportive community of like-minded individuals who are passionate about creativity, home decor, DIY projects, food/drink, crafts, and all things lifestyle.

Leave a comment